Converting already existing codes may be a little difficult depending on the amount of coding knowledge you have. Because of the way v5 is structured, if you were to try and make an existing v4.5 code as a new plugin for your v5 forum, it probably won't work out of the box without some elbow grease.
I'm going to go ahead and give a basic tutorial on how to use the plugin system to create a new plugin for your forum. This will be a basic tutorial, equivalent of a "Hello World" if you will. This might not be a whole lot of help to you, Moonbeam, since this tutorial will be about creating a new code rather than trying to convert an existing one. But this is meant to be a general tutorial for someone who likes the idea of the plugin system, but currently finds it to be a bit daunting. This should help you get an idea of how the plugin system works in v5. All images below are re-sized for the post to prevent the page from stretching, but you can click on them for a full sized view.
The plugin that's being created in this tutorial is a simple plugin that will let you place an image of your choice in between the welcome table and forum content. As you can see, I'm using a fresh copy of v5, but you can do this on your converted v4.5 forum.
First thing to do is to login to a staff account on the forum that has access to plugins. Once logged in, click the "Admin" button at the top of the page. On the first page you see in the admin panel, click on the "Plugins" option found on the page to be brought to the forum's plugins area. Since we're creating a new plugin, click the "Build" option with the truck image.
If you haven't created a plugin before, the screenshot above should be what you see. This page has 3 tabs:
Manage: This tab will list out all of the plugins that you have created and imported. This is the screen where you can modify plugin settings (if available) by clicking the name of the plugin, as well as where you can import a downloaded plugin by using the "Import Plugin" button.
Build: This was the screen that you were brought to when clicking the "Build" option on the plugins screen earlier. This is where you can build, modify, or export a plugin that you created.
Keys: Keys are used in more advanced plugins that need to store data for them to function. Not every code will make use of keys, but if you have any plugins installed that uses them, those keys will be displayed on this page.
Going back to the "Build" tab, click the "Create New Plugin" button to get started.
When you click the "Create New Plugin" button, a pop-up will display asking you for the name and description of the new plugin that you are wanting to create. For this example, I just made the name for the plugin "New Banner" as well as provided a brief description for what the goal of the plugin is. You will be able to change the name and description at a later time if needed. Once you have the info filled out, click the "Create" button.
After you click the create button, you'll be taken to the Plugin Editor. The Plugin Editor has 6 tabs:
Settings: This is the screen you should see right away after clicking the create button. Here you can change details such as the name of the plugin, it's ID, description, as well as add or remove staff members from your forum that will have the ability to modify this plugin.
Components: This is the meat of the plugin editor. This is where you will add the code for the plugin to function the way you want it to. We'll be going over this page in detail a little later.
User Interface: Here is where you can setup fields that can be modified by forum staff after the plugin is created. We'll also go over this page in detail in a later segment of this tutorial.
Images: In this area you'll be able to upload or link to an image that you want to have featured in the plugin you're creating. The images you upload or link to here will then have a variable assigned to them that you can use in the code of your plugin. Since the plugin we're creating in this tutorial will have the user define their own image that they want to use, we won't be using this page for the example plugin.
Keys: Keys, as noted earlier, are used in more advanced plugins that need to store certain information. You can read the description on this page to get an idea for what you can store in a key, as well as how much storage space each key has. Keys are not required for plugins that won't need to make use of them. For example, the plugin we're creating in this tutorial will not need a key, so we will not create a new key for this plugin.
Export: Once the plugin is completed, you can export the plugin here to save the plugin to your computer. You can use this file either for a backup to use later, or to share with other forum owners so that they can import the plugin you created into their own forum.
Now that each tab is explained, lets go over what the plugin we're creating today is going to do for the forum, and how it will function. The goal of the plugin is to have an image display at the top of the forum, but we want this image to be defined by the forum staff that has access to this plugin. Since we know that we're going to require user input for the plugin, lets visit the "User Interface" tab so we can create some fields that those users can enter in the required info at.
The user interface is what forum staff will use to make modifications to the plugin after the plugin has been created, or after it's been imported to their forum. This page can be viewed by clicking on the name of the plugin while in the "Manage" area of the plugins page of the admin panel. You can click the "Preview Mode" button at the bottom of the page at any time to get an idea for what the end user will see after the plugin is created.
At the "About" tab, you can add or modify the description of the plugin. Once that's done, click on the "Add Tab" option to create a new tab for the plugin's interface. For the Tab Name, I'm going to call it "Plugin Settings" for this tutorial. You should see the name of the actual tab change as you type. You'll notice that a new "Add Tab" will appear; you can create up to 7 additional tabs for the plugin if more tabs are desired. Now that we've given the tab a name, lets take a look at the right-hand side bar on this page and you can see what kind of things we can do.
Author Tools: The tools provided here are separators that you can add to the user interface of the plugin. "Title Bar" will add a new title onto the page with a line graphic, "Bold Text" will allow you to have something written in bold on the page, and "Plain Text" will allow you to add plain text to the page. For this tutorial, lets add a Title Bar by clicking on the "Title Bar" graphic, and you should see a new field display on the page. Lets give this title bar the name of "Banner Image:". After the text is added, you can click the "Preview Mode" button at the bottom of the page to see how it will look on the page. You'll see that this is just a separator used to describe what fields you intend to add below, and is not modifiable. Click the "Exit Preview" button to return to the plugin editor.
Forum Fields: In this area you can see all of the different fields that you can add to a plugin. In the example plugin that we're making for this tutorial, we'll only be using the first "Field" option to add a defined text field, but you can see the various options you can add to the user interface of plugins that you can have forum staff modify for the plugin.
Let's add a traditional field by clicking the "Field" option found at the very top of the Form Fields list, and you will notice some settings for the field will appear to the left of the page. This field will be where a forum staff member can type in the URL of the image they want to have display at the top of the forum, so with that in mind, lets give this a Field Title of "Image URL". You'll notice that once you typed in "Image URL" into that area, the Variable ID will have automatically updated to
image_url for you; keep this variable ID in mind as it will be used on the "Components" screen when we get there. Next, lets add a description for this field based on what the info is we're looking for. I added the following as the description: "Enter in the URL of the image you would like to display here". Once that's set, click the drop-down menu that currently says "Anything" and set this to "URL", since you only want a valid URL to be entered into the box. Lastly, if you look to the right of those options, you'll see a Checkbox. We want to make this field required before the plugin can be enabled on the forum, so let's check this box to make this input a requirement. Once the box is checked, you should see a yellow notice at the top of the page that reads "This plugin may not be enabled until the required field "Image URL" is filled out and saved." -- we'll get to this later after the plugin is created. For now, just ignore the message.
Now that we have a field for the image URL to be placed, lets add one more field for the Alt text to display for the image. For this one, you can either click the "Field" option again to add a similar field as before, or you can click the "Text Area" option as either of those will work for the type of text we're looking for. Once you have the field added, lets give this one a field name of "Alt Text" (again, keep note of the
alt_text variable ID). For the description, I added the following text: "The text you enter in here is what will display to members that have images disabled, or if the image is unable to load." -- I left the box unchecked to require this field, since the plugin will still function without it. Once everything is all said and done, the following is what the settings will look like:
Let's take a look at a preview by clicking the "Preview Mode" at the bottom of the page and you can see what the plugin settings will look like for forum admins that use this plugin. Notice that when you hover over the

button causes the description for the fields to pop-up. If everything on this page looks good to you, let's exit the preview and enter into the "Components" tab of the plugin editor.
The components tab at first is going to look pretty bare, but this is where you really begin to develop the plugin that you are making. Here you can add components for your plugin using JavaScript, CSS, or HTML via Global, Main, Category, or Board headers and footers. You can use a combination of these components to work together if you would like. For our example plugin, we are only using basic HTML, so let's add a Global component by clicking the "Global" icon. You should now see a text area that displays to the left. The text area will have two tabs for Header as well as Footer; since we want the image to display at the top of the forum, we'll stick with the Header tab. In the text area, let's type the following HTML to add an image to the page:
<center>
<img src="" alt="" />
</center>
I told you it would be basic

Once that's typed out, look to the right under the components that you can add. Notice the two variables
image_url and
alt_text that was created in the User Interface area? Let's use these in the code that you just typed out. To do this, click in between the quotes found in
src="" so that your text cursor is in between the two quotes. Once your text cursor is there, click on the
image_url variable from the right-hand side bar and then click the "< Insert" button. You should now see
$[plugin.settings.image_url] appear in between the two quote marks. Lets do this once more with the
alt_text variable by finding the
alt="" and again click in between the quote marks so that your text cursor is in place between those two quote marks. Once your text cursor is in place, click the
alt_text variable from the right-hand side bar and then click the "< Insert" button and you should see
$[plugin.settings.alt_text] appear in between the two marks.
Once those variables are in place, click the "Save Changes" button and you're done! So now lets get this plugin setup on your forum so you can see how it works. To do this, mouse over the "Plugins" option found at the very top-right of the admin panel, then click the "Manage" option. Once here, you should see the "New Banner" plugin that you just created listed on the page, but it cannot be enabled yet since it needs to know an image URL to use for the plugin to work. To do this, click on the plugin name "New Banner" and you'll be brought to the New Banner Settings page that you setup earlier. Once there, click the "Plugin Settings" tab and enter in the URL of an image you would like to use for the plugin. For this example plugin, I used the URL:
images.proboards.com/hotlink/proboards_blue_145x36.png with the alt text of "ProBoards Free Forums!". Click the "Save Changes" button and you should see the yellow notice above that says "This plugin is currently disabled. click here to enable it." -- click the "Click Here" link in the message and the plugin will now be enabled on your forum!
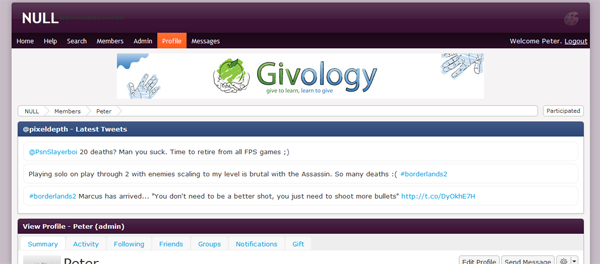
Now that the plugin is enabled, visit the home page of the forum and you should see the image you set displayed on the forum:
And that's it, you just created your first plugin! While this plugin is pretty basic at the moment, you can add to it to make it your own, such as by adding a JavaScript component to make the image hide on the page when clicked, or add to the user interface by adding an option asking whether or not the image should link to somewhere when clicked. If you didn't go through the process above to create the plugin (which I would suggest you do), I've provided the plugin available to download as an attachment in this post. You can feel free to download it and import the plugin to your v5 forum to play around with it and add to it with your own ideas.
One thing I want to note about this particular plugin is that you could very easily just add HTML to your global header to achieve this, like in the current v4.5, rather than creating a whole plugin for it. But I figured this was good example that everyone could relate to in order to help get familiarized with the plugin feature
 [Download plugin]
(side note: If you find any type-o's or errors, PM me so I can get those corrected.)


 Once that's typed out, look to the right under the components that you can add. Notice the two variables image_url and alt_text that was created in the User Interface area? Let's use these in the code that you just typed out. To do this, click in between the quotes found in src="" so that your text cursor is in between the two quotes. Once your text cursor is there, click on the image_url variable from the right-hand side bar and then click the "< Insert" button. You should now see $[plugin.settings.image_url] appear in between the two quote marks. Lets do this once more with the alt_text variable by finding the alt="" and again click in between the quote marks so that your text cursor is in place between those two quote marks. Once your text cursor is in place, click the alt_text variable from the right-hand side bar and then click the "< Insert" button and you should see $[plugin.settings.alt_text] appear in between the two marks.


